This post shows you how to install MySQL Server on Ubuntu. MySQL (My Structured Query Language) is an relational database management system that is widely used to store information (most commonly for websites). Several web applications such as WordPress, Drupal, MyBB, phpBB, etc. use MySQL to store data. It is one of the core components of LAMP stack (Linux, Apache, MySQL, and PHP) or LEMP stack (Linux, Nginx, MySQL, and PHP). But why do you need MySQL Server running on your Ubuntu machine or Ubuntu home server? Well, if you would like to setup a shared Kodi Library you will need to install MySQL Server on Ubuntu. You also need MySQL if you run a typical web server or website from your home server.
Install MySQL Server on Ubuntu with LAMP Stack
A LAMP stack, which includes MySQL, can be installed during Ubuntu Server installation as shown in the picture below. You will be presented with the following package selection window during Ubuntu Server installation. If you install LAMP server you will have MySQL server installed as well. To install MySQL server on Ubuntu this way, just follow our Ubuntu Server setup guide. You can then secure MySQL as described later in this post.
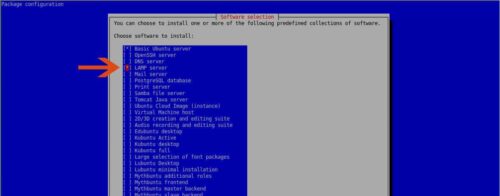
If you did not install LAMP server during Ubuntu Server installation, you can always call the above window using the following command:
sudo tasksel
If you get an error message saying tasksel "package is not installed" or "command not found" then install it using the command below:
sudo apt-get install tasksel
Then, rerun sudo tasksel command to install LAMP server. [Read: Minimal desktop environment for linux servers]
Install MySQL on Ubuntu - Standalone Method
MySQL installation on Ubuntu using LAMP stack installs Apache web server and PHP as well. If you have no plans of running a webserver these packages are not needed. So if you want to install MySQL server on Ubuntu or Ubuntu Server as a standalone package you can do so using the following command:
sudo apt-get install mysql-server
During MySQL setup on Ubuntu Server, you will be asked to enter a strong password for the "root" account, as shown in the picture below. You will have to type the same password twice to confirm. Needless to say, note down the password in a safe location or choose something you will remember.

A root account is the administrator account for MySQL. Root account can access all databases within MySQL. Since this is a security risk, always setup a very strong password for the root account. If you are trying to setup a MySQL shared library for Kodi, you will be creating a separate user that will only have access to the Kodi library database.
Recommended Guides for MySQL and phpMyAdmin:
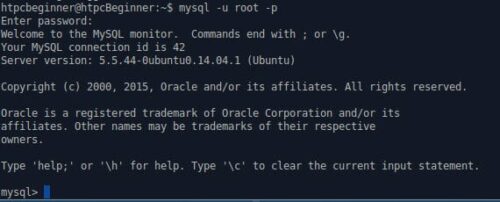
Once the MySQL setup completes, you can enter the MySQL commandline prompt using the command mysql -u root -p, as shown below.
If you are new to Linux, you may prefer not to work in commandline mode. If so you may install phpMyAdmin, which offers a web-based interface to create and manage MySQL databases. If you decide to use phpMyAdmin then take a look at these phpMyAdmin Tweaks to enhance your experience.
One thing to note is that if you install phpMyAdmin then Apache and PHP will be automatically installed as they are needed for phpMyAdmin to function. For this reason, I always recommend installing the whole LAMP server using sudo tasksel command as described above. If you do not want Apache or PHP for some reason, you may install Webmin on Ubuntu, which has a very basic MySQL database manager.
Secure MySQL Server
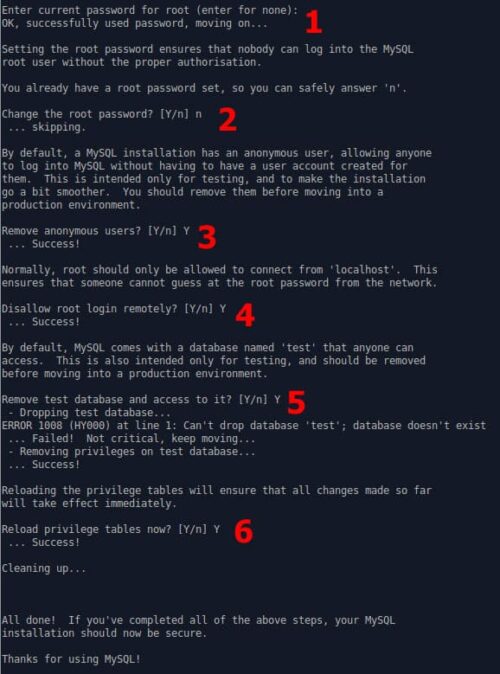
Now that you have setup MySQL on Ubuntu Server, let us secure it. Securing your MySQL database server is highly recommended and it is very easy to do. Just run the following command and follow through the 6 steps.
sudo mysql_secure_installation
As shown in the picture below, first you will be asked to enter the current root password to continue. Then you will have the option to change the root password. You can say "n" if you don't want to change it. Then say "Y" to "Remove Anonymous Users", "Y" to "Disallow root login remote", and "Y" to "Remove test database and access to it". And finally, answer "Y" to reload the new privileges.
That's it, you have secured your MySQL server. Note that this only offers basic security that is sufficient for a home user. For advanced applications a there are several protection methods available that are beyond the scope of this post. [Read: How to install PHP on Ubuntu?]
As you can see, it is very easy to install MySQL in Ubuntu. The procedure exactly same to install MySQL on Debian Linux as well. So go ahead, install MySQL Server on Ubuntu and start setting up a website or a shared Kodi media library.

