This post, which is a part of my VirtualBox series, shows how to install Ubuntu Server on VirtualBox. I have already shown you how to install Virtual Box on Ubuntu and Windows systems, and how to install Ubuntu Server as home server. This VirtualBox Ubuntu Server guide combines the two and allows you to install and run Ubuntu as Virtual Machine. Using this method you may also install Ubuntu on VirtualBox. In fact, the process is nearly identical for other Linux distributions, OS X, and Windows as well. Without further ado, let us look at how to install Ubuntu Server edition on VirtualBox 5.0.
Table of Contents
Install Ubuntu Server on VirtualBox
Running a VirtualBox Linux Server allows you to run a server from your existing system without making any permanent changes to your hard drive. These SSDs, high-capacity hard drives, and 8GB (or even 16GB) RAM are very common. Therefore, most laptops can easily handle running two operating systems (one on the host and one as virtual machine). This VirtualBox Ubuntu installation guide is OS independent. Therefore, your host system can run any OS. Before we begin make sure that you have installed VirtualBox following one of the following posts:
Download Ubuntu ISO for VirtualBox
Head over to Ubuntu download page and download the release of your choice. Or, download the ISO image of any other operating system that your interested in. In this post, Ubuntu Server 14.04.02 LTS ISO image is used as example.

Create a Ubuntu Server VirtualBox VM
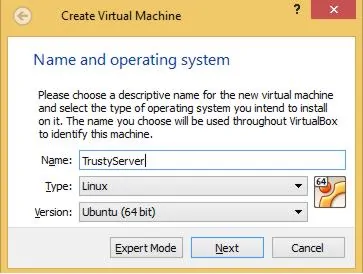
To install Ubuntu Server on VirtualBox, from the VirtualBox main window hit New to create a new VM. As you type the server name (TrustyServer in this case) the type and Version of OS may automatically be populated. If not, change them to appropriate ones.
Next, set the amount of RAM memory to allocate to the VM. I recommend choosing at least 1024 MB of RAM memory (2 GB if available). For a basic Ubuntu headless VirtualBox Server, you may be able to get by with 512 MB RAM. Then, you will be presented with the option to create a virtual hard drive for your VBox Ubuntu Server VM. You can use an existing virtual hard drive if you have one. If not, create a new hard drive with at least 8 GB space.
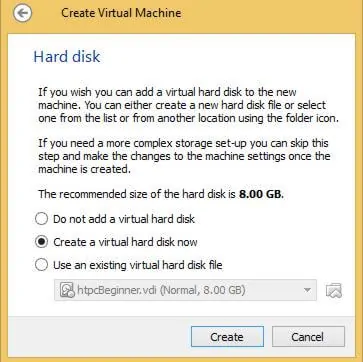
Leave the hard drive file type to the default (VDI). If compatibility with VMware is important, choose VMDK. In the next window, choose "Dynamically allocated" for "Storage on physical hard drive". Dynamically allocated expands hard drive as needed up to a maximum size set in the previous step. Finally, click OK to complete creating a new VM for Ubuntu Server. The new VM should appear on the virtual machines list on the left.
Mount Ubuntu Server ISO as CD
Next, right-click on the Ubuntu Virtual Machine you created (in this case, TrustyServer) and go to Settings->Storage.
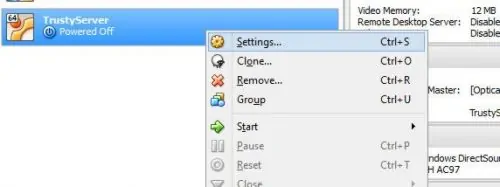
As shown in the picture below, check "Live CD/DVD" on the right size. Then click on the disc icon, browse for the Ubuntu ISO file you downloaded above, and select it to mount it as a CD. You will use this mounted ISO file to install Ubuntu on VirtualBox.
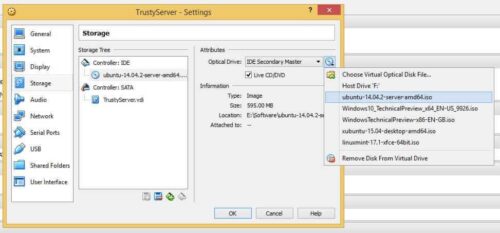
Click OK and start the new VM to setup Ubuntu on VirtualBox. The VM should boot from the Ubuntu Server installation ISO.
Install Ubuntu on VirtualBox
Once your Ubuntu VM boots, follow the onscreen prompts to install Ubuntu Server on VirtualBox. You may use the following two posts as guidance.
- Install Ubuntu Server 14.04 Trusty Tahr as a home server
- Video: How to install Ubuntu Server 14.04 Trusty Tahr?
Ubuntu Server installation on VBox is exactly same as on a standalone system. Instead of booting from USB Ubuntu installation stick or CD, you will boot your Virtual Machine from the download ISO file. Just as on a standalone system, you may choose to create separate partitions or partition the whole virtual disk for Ubuntu installation. Setup Ubuntu on VirtualBox using the above two posts as guidance.
Recommended HTPC / Home Server Builds:
- Best Home Theater PC Build 2017 to do it all (Plex, Kodi, NAS, Gaming)
- Best Emby Server builds 2018 – Pre-built and DIY options
- Medium Budget 4K HTPC Build 2017 for Kodi, Plex and Gaming
- Cheap 4K HTPC Build for Kodi, OpenELEC, and LibreELEC 2017
- Low Power Home Server Build 2017 for Network File and Media Storage
- Best HTPC for Kodi with 4K on a Medium Budget 2017 (~$400)
- Energy efficient budget HTPC-NAS combo build 2016
Once VirtualBox Linux installation is complete, reboot your virtual machine and you should boot in to your Ubuntu Server VM. Next, consider reading through the following posts to setup VirtualBox guest additions, shared folders, extension pack, and USB drive sharing.
Complete Guide to Setting Up a Home Server on VirtualBox Virtual Machine:
- Install VirtualBox - Windows 7/8/10 / Ubuntu/Debian
- Install VirtualBox Extension Pack - Linux and Windows Host
- Install Guest OS on Virtual Box - Ubuntu Server
- Install VirtualBox Guest Additions - Windows Guest / Linux Guest
- Update VirtualBox Guest Additions - Windows Guest / Linux Guest
- Setup VirtualBox Shared Folder - Windows and Linux
- Mount VirtualBox Shared Folder - Windows Guest / Ubuntu Guest
- Access USB Drive on VM - Windows and Linux Guest
- Configure Home Server on VirtualBox - Ubuntu Server
Few weeks back, we published a list of best home server operating systems. Installing these OSes on VirtualBox is the best way to test and figure out which OS fits your needs/liking. Or if you already know what OS to use but don't have a system to spare, you can choose to run the OS of your choice within VirtualBox on your host system. You can even connect a USB hard drive, filter it to the Virtual Machine and run a home server on VirtualBox. All without making any permanent changes to the hard drive. Isn't that cool? Go ahead install Ubuntu Server on VirtualBox and give it a shot.

![[Video] Install Docker and Docker Compose on Ubuntu - Don't Do It WRONG Video Thumbnail: Install Docker on Ubuntu (with Compose) – Don't Do It WRONG](https://www.smarthomebeginner.com/images/2023/03/install-docker-on-ubuntu-with-co-1.jpg)
