If you are a first-time user of Kodi, or if you are an experienced veteran, looking for a guide to make the audio quality of your movies and streams better, or solve Kodi sound problems, then you've come to the right place. Though I won't be telling you what is the golden setup you should use -as this depends strongly on your hardware and other factors-, we will surely take a look at the audio settings available for Kodi and what they do. Think of this as a Kodi setup guide to understand the options available, which you can use in Kodi for Android, Kodi for Windows, or any other version. [Read: How to install XBMC on Ubuntu?]
It is clear that, for configuring Kodi, there are already automated solutions, like for example Kodi Configurator for Android, which chooses the best settings available for your device -though you can still change them later on- and even adds content and streaming sources, making it an ideal piece of software to use with Android media players. But sometimes it's better to take matters into our own hands; specially if the quality of our audio is involved. What do all these Kodi audio settings mean? We tell you in this article.
Best Android TV Boxes:
- NVIDIA SHIELD TV Pro Home Media Server - $199.99
- Amazon Fire TV Streaming Media Player - $89.99
- WeTek Play 2 Hybrid Media Center - $134.00
- Kukele Octacore Android TV Box - $179.99
- U2C Android TV Box - $95.99
Table of Contents
Kodi Audio Settings: confusing but helpful
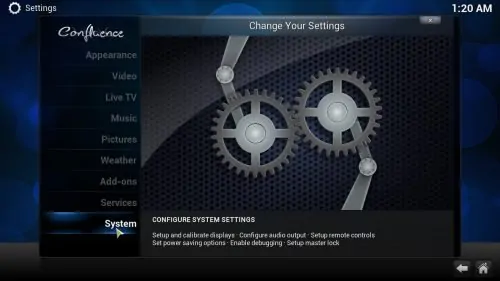
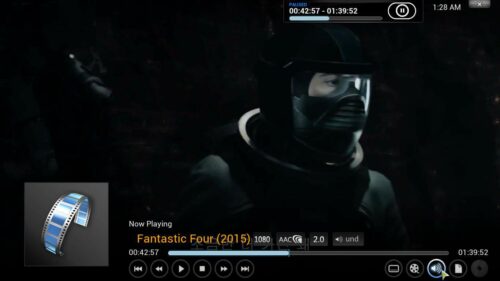
How to set up Kodi audio? First things first, there are two possible menus where you will find settings to modify Kodi audio output; one of these is located in the settings menu, which can be accessed via System -> Settings -> System -> Audio output; we will call these Kodi audio settings the main audio settings. There is also a menu that you can get during playback, if you click the button with a speaker on it (on Confluence skin), and allows you to configure some other Kodi audio setting; we can call this menu the audio playback settings. In this menu you can do things related to the playback itself, such as offset the audio or even add subtitles to your media, provided you have the right service installed. [Read: Guide: How to add Kodi subtitles to your streams and movies]
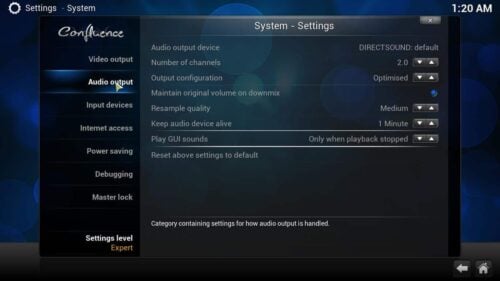
Kodi Audio Settings: main audio settings.
- Audio output device: Here you can select which one of the audio outputs from your computer you will be using. Depending on what you select here, some settings further down might be enabled or not.
- Number of channels: If your audio connection is digital, this represents the channels supported by the audio connection; if it's analog, it will represent the number of speakers your system is using.
- Output configuration: You can set this option to Fixed, Optimized or Best Match. This will let you know if properties such as sampling rate and speaker configuration will change during playback to match the source (which is done in Best Match setting); will be set at the start of playback and not change (corresponds to Optimized); or will be set by the value indicated in settings at all times (which would be the Fixed option).
- Limit sampling rate (kHz): If you set fixed output, this indicates the sampling rate. If you are using SPDIF, this is the maximum sampling rate.
- Stereo upmix: When enabled, it lets 2-channel audio be upmixed to the number of channels set in Kodi audio settings.
- Normalize levels on downmix: Also can be called Maintain original volume on downmix. When enabled, keeps the volume of the stream, at the cost of compressing dynamic range. When disabled, volume will be lower but the dynamic range will be maintained. Keep in mind the dynamic range is defined as the difference between the quietest and the loudest sounds in an audio source; thus, you should enable this setting if the dialogue in movies is barely audible.
- Resample quality: If you need to have audio sampled at a different rate than the source, this is the option you need to tweak; you can set it on Low, Medium and High, but the latter two will consume more computer resources.
- Keep audio devices alive: Defines the time audio devices will wait before entering a suspended state. It also has Always (audio devices never suspended) and Off (audio devices always suspended) settings. This setting uses a lot of CPU resourses, so depending on your hardware it might not be available.
- Play GUI sounds: Define whether you want to hear GUI sounds or silence when browsing through the menus. You can also have the sounds play only if media playback is stopped.
- Enable passthrough: With this setting you can enable passthrough Kodi audio output for encoded audio formats.
- Passthrough output device: Only useful if you enabled passthrough audio, this lets you select the device you will use for audio playback of encoded formats.
The formats you could use are selected via this very same menu, and depending on your device, you could select:
- Dolby Digital (AC3) capable receiver.
- Enable Dolby Digital Transcoding: To be selected in case the audio output device only supports multichannel audio.
- Dolby Digital Plus (E-AC3) capable receiver.
- DTS capable receiver.
- TrueHD capable receiver.
- DTS-HD capable receiver.
Make sure you select a format compatible with your device to avoid slowness or freezes on your media!
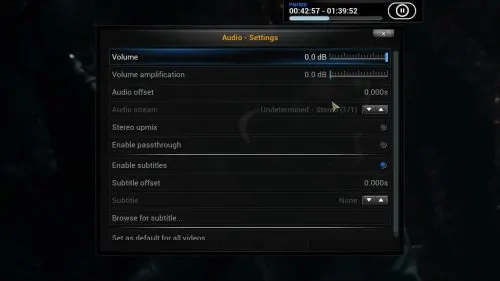
Kodi Audio Settings: audio playback settings.
- Volume: Select the volume of your media.
- Volume amplification: Some sources are very quiet even if you crank up the volume all the way. Use the amplification in Kodi audio settings to solve that (if the audio gets too distorted, get another source!)
- Audio offset: Sometimes the audio and the video seem to go separate ways. With this setting you can bring them back on track together and make them sync properly.
- Audio stream: Useful for media with more than one audio stream, you can use this option to select which one you want to hear.
- Stereo upmix, Enable passthrough: They are the same as the ones you can set on the main Kodi audio settings. See above.
- Enable subtitles, Subtitle offset, Subtitle and Browse for subtitle: These options are for subtitle control; bring them over your media, make them sync properly, browse your downloaded ones for the movie, or download new ones.
- Set as default for all videos: Make these settings apply to all videos from now on.
I'm overwhelmed by so many Kodi Audio settings!
So am I! But hey, it's awesome we have such an amazing tool at our disposal for free, right? Having many options it means Kodi can adapt to any user's needs and satisfy a huge number of people. If you want to try out these settings experiment with them and perhaps one of the best movie addons for Kodi, or sit back and relax watching the top live TV addons for Kodi; I'm sure you will have a great time and, perhaps, hear your movies a little bit better!

![10 Best Plex Client Devices [2022] - STUTTER-free Streaming Best Plex Client Devices](https://www.smarthomebeginner.com/images/2022/02/best-nas-for-plex-server-featured-images-from-pexels-photography-maghradze-ph-3764958-e1648542743772.jpg)
![10 Best Jellyfin Client Devices [2022] - 4k, Hardware Transcoding, etc. Jellyfin Roku App](https://www.smarthomebeginner.com/images/2021/02/jellyfin-roku-client-app-ft.jpg)
![10 Best Emby Client Devices [2023] - 4k, Hardware Transcoding, etc. setup emby server with raspberry pi](https://www.smarthomebeginner.com/images/2017/02/setup-emby-server-with-raspberry-pi.jpg)
![15 Best Plex Alternatives [2022] - FREE and BETTER Options Best Plex Alternatives feature image](https://www.smarthomebeginner.com/images/2022/08/best-plex-alternatives-feature-image.gif)

Good article, thanks!
Question re; the in-playback audio options… Sometimes these settings seem to persist between different videos and other times they don’t, at least in my configuration. For example, I may cut the dynamic range on a given movie with quiet dialogue, but if I come back to that movie it sometimes remembers my change, but not always. And sometimes it’ll apply that change to other movies, but not always.
What’s the expected behavior here?
Hello, thanks for commenting,
As a general rule, I would expect the general audio settings to persist between movies, and the in-playback audio settings to not persist between movies. At least, this is what I would expect from a logical standpoint. My guess is that if the options seem to persist, it might be because they are kept in memory during your current viewing session, only to be reset to their defaults when you turn off Kodi. However, this is just a guess of mine and I would have to test quite a bit to confirm this is the behavior.
The good part is that we can always configure them, at least!
If I enable pass through from the speaker icon in the movie menu….does it even matter if I select 5.1in the system settings? Or should I keep the system settings at default and only use the pass through. I’m so confused. I don’t want to alter the coded sound distribution.
Im no techie so a lot of what Im going to say is going to sound wrong. I am running Kodi on my laptop that has Ubuntu installed. I have split my hard drive in 2- a portion for Ubuntu and the other portion for Kodi. It has been working fine with no issues. Within the last 3 months I havent been able to hear any audio from anything I play on Kodi. When I switch to Ubuntu I can hear audio from things like youtube or other websites. If I go back to Kodi.. dead silence. I have gone through many instructions from several websites and I have yet to correct the problem. Can you please help me.
Hello, How exactly did you install Kodi by itself? Do you mean OpenELEC or any other implementation? If you want, please post on our htpcBeginner Suppport Forums so we can troubleshoot the issue further!
In an ASUSTOR Nas with HDMI and SPDIF outputs, we would like to hear audio even directly on my TV 2 way audio speakers via HDMI, and on my DTS Home Theatre via Optical SPDIF.
The choice should be made only powering ON or OFF the Home Theatre system…
Is it possible without changing Kodi settings each time?
Or ther’is a way to chenge this setting quickly?
Best regards in advance for your answer!
Hello, I don’t think Kodi has a way to change this setting quickly. I am more inclined to think you’d be better off using a hardware-level switch or setting, possibly on your device. I know it’s not much information, but hope it helps a bit.
Still, you could post your question in our htpcBeginner Support Forums and check if some users have the answer to this. Thanks for posting!
Hi. I am trying to set up Kodi to play to my a/v stereo system, so I think this is done by enabling playback. You talk about it above, but the screenshot of the expert main audio settings shows no option to enable passthrough or to define the passthrough output device. Your screenshot shows exactly what I see when I go into the expert audio settings. Does one have to change a setting somewhere for these options to show up on the expert audio setting menu?
Hello, to my understanding, this option only shows if passthrough is available for your device, otherwise it doesn’t show up.
Hi there. I have Kodi installed on a fire tv stick. I also have a WD Tv Live media player with a hard drive connected to it. I am able to access this hard drive over wifi from Kodi and play media from it. Some of the movies I have on the hard drive are dts encoded and some are just 2 channels. When playing the movie using the media player through an onkyo av receiver, the receiver automatically allows the movie to play with the encoded dts channel from the movie file itself. However, when I play it through kodi, my received remains on all channel stereo instead of switching like it does when playing through the media player. Is this a setup issue that I just need to change? Hope that makes sense. I’m not always sure what all of these setting mean etc.
Perhaps this is an odd use case, but here goes…
I’m replacing a Linux based “real computer” media center with a Pi3 running OSMC.
On the old media center, I had two logins set up – one that defaulted to MythTV, one that auto-loaded Spotify.
The audio was set up so that the MythTV audio went out on HDMI – to the TV. The Spotify audio went out from the analog audio card (to an AV receiver.)
The general idea was that someone could be watching video on the TV, using the TV’s speakers, at the same time as Spotify was streaming audio through the receiver to the rest of the house.
So…. the kids are watching a movie using a standard remove to control the video, I’m in the office listening to music over speakers… And of course using an app to control the music.
Any way to do this with a single Pi and OSMC or should I just get two Pi’s and dedicate them to each use?
I see the Pi3 has both HDMI and an analog output, but I can’t find any option that lets me send video-audio to one and music-audio to the other.
Thanks,
Todd
Hi all.. I’m fairly new to all of this so here goes.. I installed kodi 17 on my FireSticks and was able to load the video add-ons that I’ve snooped around for. All seems perfect..
I’m having audio problems.. the music and background of movies is very loud, but I’m having trouble hearing the actual voices of the characters.. Any suggestions? I’m not very techie, but I’ve been able to load a couple of FireSticks for friends.. it seems I had a power surge and needed to restart my stick and I notice the difference..