PHP is a very popular language for dynamic websites such as those using WordPress. Parsing PHP scripts, converting them to opcode, and converting them again to machine code can be quite taxing on the CPU. This in turn affects the site speed and performance. In my previous posts (this and this), I showed how to check site loading speed and described a few ways to improve it. In this post, I am going to describe how to install and use alternative PHP cache (APC) to cache PHP files / codes. This results in faster execution time, reduction of CPU load, and better site speed. For those who self-host their WordPress site or whose Hosting provider offers APC, I am also going to explain how to make APC work with W3 Total Cache, the best WordPress cache plugin.
Recommended Guides on WordPress:
Table of Contents
How Alternative PHP Cache Works
APC caches frequently access PHP files and codes in opcode format, which is the intermediate code from the parsed and compiled PHP scripts. Cached opcodes are in shared memory and served when needed, reducing the need for parsing and compiling PHP codes again. Unlike other caching systems such as memcached APC stored both the opcode and the data. Memcached stores only the data, which is accessed by applications through TCP. Therefore normally (there are exceptions), if you have APC installed and working, you do not need memcached.
Step 1: Install APC in Ubuntu
Unlike previous releases of Ubuntu, installation of APC in Lucid Lynx (10.04) and later is extremely simple. It is available through the repository. Although you may compile and install the latest release of APC (Ubuntu repository is normally a bit outdated), I recommend going with the repository installation route for compatibility reasons. You can install APC using the following command:
sudo apt-get install php-apc
During the installation process, you will be asked a series of questions regarding activation of experimental modules. I recommend that you do not enable experimental modules. You can hit enter to choose the [defaults]:
Enable internal debugging in APC [no] :
Enable per request file info about files used from the APC cache [no] :
Enable spin locks (EXPERIMENTAL) [no] :
Enable memory protection (EXPERIMENTAL) [no] :
Enable pthread mutexes (default) [yes] :
Enable pthread read/write locks (EXPERIMENTAL) [no] :
Restart Apache:
sudo service apache2 reload
Step 2: Verify APC Installation
You can verify if APC is installed and running using the following command:
php -r "phpinfo();" | grep apc
The output should look something similar to the one below. Do not worry about details in the output yet. It will vary depending on your APC settings, which are discussed later in this post.
Additional .ini files parsed => /etc/php5/cli/conf.d/apc.ini,
apc
MMAP File Mask => /tmp/apc.XXXXXX
apc.cache_by_default => On => On
apc.canonicalize => On => On
apc.coredump_unmap => Off => Off
apc.enable_cli => Off => Off
apc.enabled => On => On
apc.file_md5 => Off => Off
apc.file_update_protection => 2 => 2
apc.filters => no value => no value
apc.gc_ttl => 0 => 0
apc.include_once_override => Off => Off
apc.lazy_classes => Off => Off
apc.lazy_functions => Off => Off
apc.max_file_size => 10M => 10M
apc.mmap_file_mask => /tmp/apc.XXXXXX => /tmp/apc.XXXXXX
apc.num_files_hint => 4096 => 4096
apc.preload_path => no value => no value
apc.report_autofilter => Off => Off
apc.rfc1867 => Off => Off
apc.rfc1867_freq => 0 => 0
apc.rfc1867_name => APC_UPLOAD_PROGRESS => APC_UPLOAD_PROGRESS
apc.rfc1867_prefix => upload_ => upload_
apc.rfc1867_ttl => 3600 => 3600
apc.shm_segments => 1 => 1
apc.shm_size => 128 => 128
apc.stat => On => On
apc.stat_ctime => Off => Off
apc.ttl => 7200 => 7200
apc.use_request_time => On => On
apc.user_entries_hint => 4096 => 4096
apc.user_ttl => 7200 => 7200
apc.write_lock => On => On
Step 3: Check APC Web Interface
APC comes with a great web interface that provides a wealth of information. It is not enabled by default. To enable it you will have to copy a file to the root of your website:
sudo cp /usr/share/doc/php-apc/apc.php.gz /var/www
sudo gzip -d /var/www/apc.php.gz
sudo vim /var/www/apc.php
We are not done yet. For security reasons, I highly recommend you to edit apc.php file and change the username and password from their defaults (apc and password):
defaults('ADMIN_USERNAME','apc'); // Admin Username
defaults('ADMIN_PASSWORD','password'); // Admin Password - CHANGE THIS TO ENABLE!!!
Also, ensure USE_AUTHENTICATION is set to 1:
defaults('USE_AUTHENTICATION',1);
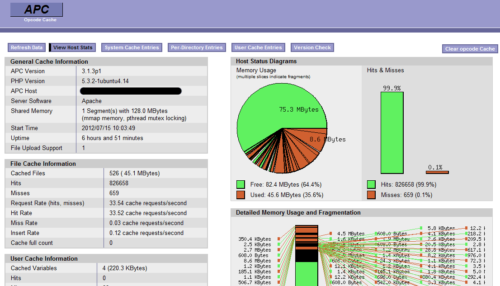
Now you can go to your domainname.com/apc.php (if you have one), 192.168.0.13/apc.php (if that the network IP of your server on which you have APC running), or localhost/apc.php if you are on the machine running APC. Below is a screenshot of the very informative web interface.
Step 4: Customize APC Settings
APC's default setting stored in /etc/php5/conf.d/apc.ini may work OK but it is recommended that you tweak few values. Detailed explanation on these values can be found here.
If you have W3 Total Cache plugin installed for WordPress, it comes a apc.ini file in \wp-content\plugins\w3-total-cache\ini folder that has some good default values. I recommend you still change the following values:
apc.stats
During development and testing set it to "1" (enabled). When set at one, file changes are checked every time a cached opcode is called. So any changes you make are immediately visible. W3 Total Cache configuration will work only if this value is to set to "1". After you are done with all editing and changes, set this value back to "0" (disabled) to improve performance and speed as APC will skill rechecking files during every request.
apc.shm_size
This the actual size of the cache. The default is 30 MB (or 32 MB if you use W3 Total Cache's apc.ini file). I recommend increasing it if you have enough RAM memory available. I recommend increasing it to, say 128 MB, like I did. The recommendation is to allocate at least twice the amount of the highest memory used by APC. Monitor APC frequently for several hours (I monitored it for 1 day). As shown in the image below (from APC web interface), on an average my APC used about 45 MB of the allocated 128 MB. Therefore, I only need to allocate 90 MB. Since, RAM space is not a concern for me, I am going to leave it at 128 MB.
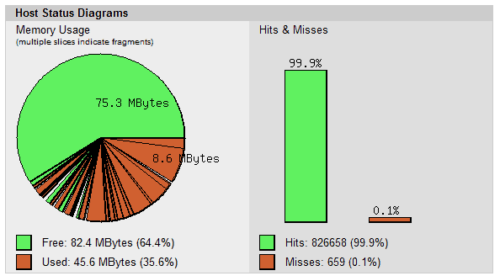
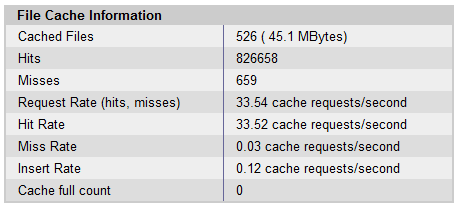
The amount of memory allocated for apc.shm_size will affect hits/misses, cache full count, and fragmentation. Hits/misses are mean things that are in the cache versus those that are not in the cache. It is normal to see some misses. As shown in the image above, mine pretty much stayed above 99% after few minutes of running APC. If you see the cache full count (shown in the web interface screenshot below) increase rapidly then increase the allocated memory.
Recommended Guides on WordPress:
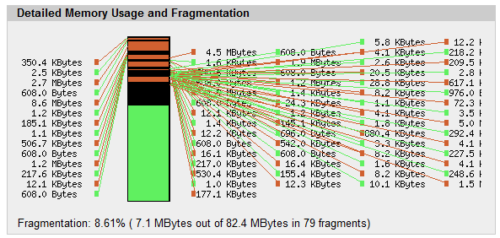
If fragmentation reaches 100% and stays there, then there might see "HTTP Error 500 Internal Server Error". It is normally to see 100% fragmentation in the first few minutes after enabling APC. Over time, it is desirable to have less than 50% of fragmentation (ideally around 10% or less). As shown in the image below, mine normally stays around 10% or less.
Remember to restart Apache, after any change. Below is my full apc.ini file:
extension=apc.so
apc.enabled = 1
apc.stat = 1
apc.shm_segments = 1
apc.shm_size = 128
apc.optimization = 0
apc.num_files_hint = 4096
apc.ttl = 7200
apc.user_ttl = 7200
apc.gc_ttl = 0
apc.cache_by_default = 1
apc.filters = ""
apc.mmap_file_mask = "/tmp/apc.XXXXXX"
apc.slam_defense = 0
apc.file_update_protection = 2
apc.enable_cli = 0
apc.max_file_size = 10M
apc.write_lock = 1
apc.report_autofilter = 0
apc.include_once_override = 0
;apc.rfc1867 = 0
;apc.rfc1867_prefix = "upload_"
;apc.rfc1867_name = "APC_UPLOAD_PROGRESS"
;apc.rfc1867_freq = 0
apc.localcache = 0
apc.localcache.size = 512
apc.coredump_unmap = 0
apc.stat_ctime = 0
Step 5: Configure W3 Total Cache to Use APC
W3 Total Cache is by far the best caching plugin for WordPress period. Although I started with Quick Cache, I have since switched to W3 Total Cache.
The tough part of installing and configuring APC is now done. Configuring W3 Total Cache to use APC is easy. All you have to do is from your WordPress dashboard go to Performance->General Settings and choose APC for Page Cache (shown in the image below), Minify, Object Cache, and Database Cache:
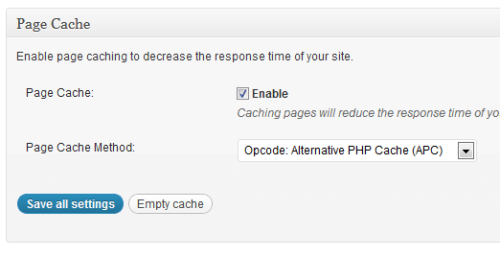
Similarly, choose APC for Minify, Object Cache, and Database Cache. In fact, I recommend you enable Database Cache only if you have APC running. Database Caching in Disk may not be the best for performance (at least that is what my research showed).
If you receive an error saying Minify rewriting is not working, then verify the settings in .htaccess. If you still see the error, you may consider disabling disabling "Rewrite URL Structure" under Minify.
When I was looking to installing and configuring APC, I had a tough time finding out all the details. This post summarizes all you need to know to install and configure Alternative PHP cache in Ubuntu and make it work with W3 Total Cache for WordPress. In my case the GTMetrix and Pingdom scores increased slightly after doing so. Hope this helps. If you have other ideas please share with us in the comments section.



![5 Best NAS with SSD Cache for Home and Office [2023] A feature image that shows all 5 of the best NAS that supports SSD caching for home and office](https://www.smarthomebeginner.com/images/2023/10/best-nas-with-ssd-cache-feature-image.png)
![Top-5 Best AdGuard Home Configuration Tips [2022] AdGuard Home Banner](https://www.smarthomebeginner.com/images/2022/04/AGH-toptips.webp)

