Having published how to install Kodi on Windows, let us now look how to install XBMC on Ubuntu systems. As you know, XBMC is a free open-source media center application that has quickly become a go to software for anybody who wants to setup a HTPC. XBMC builds are available for Android, Raspberry Pi, iOS, and other architectures among the widely used Windows and Linux builds. By running XBMC on all devices, it is now possible to share the same media library information across all their devices, which is quite amazing if ask me.
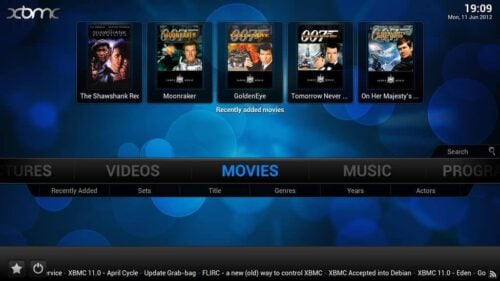
We have previously written articles on XBMC, including ways to watch ESPN, playing Amazing Prime videos, and installing XBMC with CrystalHD support on Linux. In this post, let us look at how to install XBMC on Ubuntu and other important information you should know. This guide should work for all Ubuntu versions above 11.10.
Enjoy unlimited streaming of Movies and TV Shows on several devices, free 2-day shipping on orders, and free Kindle books for only $6.60 per month. Sign-up now to get a free 1-month trial.
Table of Contents
Add XBMC Repositories
XBMC is already available to Ubuntu repositories but Ubuntu repositories will take a few days to be updated. This causes delays in updating your XBMC to the latest version. It is for this reason that we recommend you add XBMC's PPA repositories. This way, not only will you be notified of updates as soon as their available, you will also get to enjoy the latest and the greatest features almost instantly. Instructions of installing XBMC on other Linux distros are available in the XBMC Wiki.
On Ubuntu, add the repository using the following command:
sudo add-apt-repository ppa:team-xbmc/ppa
An output like the one below indicates the the successful addition of the repository. Once done, you can proceed to install XBMC on Ubuntu.

Install XBMC on Ubuntu
Anytime you install a package and especially after adding a repository, it is recommended that you update your package list using the following command:
sudo apt-get update
Then, install XBMC on Ubuntu using the following command:
sudo apt-get install xbmc python-software-properties pkg-config software-properties-common
Several packages will be automatically selected for installation, just let the installation run its course. After the installation finishes, a link to XBMC should be automatically added to your menu. Unlike XBMC Windows installation, you will not be able to choose to leave out unwanted features such as PVR. To do so you will have to compile and install XBMC on Ubuntu(a guide coming soon).
XBMC Standalone
Here is the reason why Linux is awesome especially for a HTPC, you can install XBMC as a desktop environment. When you login, you are automatically sent to XBMC screen with no other unwanted desktop environment components running in the background. This is best suited for HTPCs, where you want it to power on, boot up, and go to XBMC directly and have a remote to control it. To do this, you will need the xbmc-standalone package:
sudo apt-get install xbmc-standalone
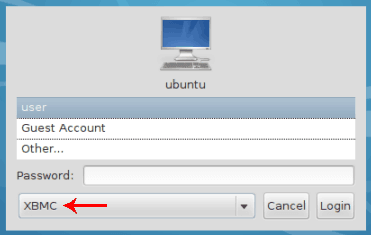
After installation, logout and login again but this time choose, XBMC for session to enter XBMC standalone desktop environment:
XBMC Userdata Folder
The XBMC userdata folder contains all your XBMC settings, addon data, thumbnails, media library information, video and music databases, GUI settings, keymaps for remotes, among other things. While, manually editing files within this folder is an advanced topic in XBMC, it is good to know the location of the folder. In Linux, the userdata folder is located here:
$HOME/.xbmc/userdata/
There very cheap (< $10) remotes available that work very well with XBMC (like this one). These remotes work out of the box on Ubuntu. To further customize the buttons, check this post.
Configuring XBMC
After you install XBMC on Ubuntu, you have to configure it before you can use it. Setting up XBMC to work the way you want is a whole new topic that requires detailed explanations on a few things. But many settings are self-explanatory. For those that require explanations, the XBMC Wiki is a good reference. Please hang tight as we work to bring you a guide on XBMC configuration.
Best Android TV Boxes:
- NVIDIA SHIELD TV Pro Home Media Server - $199.99
- Amazon Fire TV Streaming Media Player - $89.99
- WeTek Play 2 Hybrid Media Center - $134.00
- Kukele Octacore Android TV Box - $179.99
- U2C Android TV Box - $95.99
That is all there is to it. Install XBMC on Ubuntu and enjoy the pure media center experience. Refer to our Sick Beard and CouchPotato guides to enhance your XBMC experience on Linux.

![10 Best Plex Client Devices [2022] - STUTTER-free Streaming Best Plex Client Devices](https://www.smarthomebeginner.com/images/2022/02/best-nas-for-plex-server-featured-images-from-pexels-photography-maghradze-ph-3764958-e1648542743772.jpg)

![8 Amazing Raspberry Pi Ideas [2022]: Beginners and Enthusiasts Raspberry Pi ideas](https://www.smarthomebeginner.com/images/2021/09/raspberry-pi-4-dev-board.jpg)
